Monday 15 June 2020

TYPES OF ROCKS POSTER


Today, we are sharing yet another interesting school project, Types of Rocks. 

Steps to be followed:

1. Knead a small ball of maida dough. Allow it to dry for few hours or overnight. This will get dried up outside, leaving out some dried patches.


2. Roll small dough of it and roll out and flatten it. Keep this a base for a look alike rock. 


For Metamorphic Rock, we painted it with Glitter colour paint.


For Sedimentary Rocks, attached two or layers of dough and paint two colours at the same stroke to looks like sediments texture.


For Igneous Rocks, glue a small piece of scrubber and then paint to give a porous texture.


3) Glue them to the paper and design your poster on Rocks.

Happy Parenting !

Saturday 13 June 2020

CAVE PAINTING PROJECT

Cave painting is one of those interesting form of art for children. In general, Cave painting depicts the way of life people followed in prehistoric days. They are recorded to know about history and culture. The interesting aspect of those cave art is the creation of simple figures for humans and animals. It tells us more stories about the prehistoric days.

My nine year old is studying about prehistoric life, this was given us an activity for him to draw his own cave painting depicting a story. Have a look of his cave painting .


Friday 12 June 2020

FOSSILISATION POSTER

Hi all,

Today, we are sharing one of the interesting school project - Fossilisation. My 9 year old is learning about fossils. This was given as one of his home learning activity.


Fossilisation is the process of formation of fossils - how fossils are formed.

Let's see how we designed this poster.

Materials required:

Maida
Colours


Steps to be followed
:

1. Knead a small ball of maida dough. Allow it to dry for few hours or overnight. This will get dried up outside, leaving out some dried patches.


2. Roll small dough of it and roll out and flatten it. Keep this a base for a look alike rock.
3. In Stage 1, we drew a dinosaur and cut out the shape and glue to the rock. If any animal dies on land , will be covered by layers of sediment.

4. In Stage 2,  over timeItime with layers of rocks over it, leaving only the skeleton.

5. In Stage 3, the skeleton gets buried with many layers of rocks by natural.

6. In Stage 4, for fossil, we designed a skeleton using hot glue and placed leaving half way open, depicting due to erosion or wavering of rocks, fossils are found.


3. Cut a picture of dinosaur and use it in the first stage.
4. In the second stage


Thursday 11 June 2020

NOSTALGIC - DOWN THE MEMORY LANE

Down the memory lane, 15 years before clicked these Coconut trees in our farm, holding heads high with pride on the bank of River Vaigai in my native village near Madurai.

Lovely and feeling nostalgic on seeing this picture. The tender coconut tastes unique and am addicted to it. I haven't yet tasted the same sweetness of those tender coconut anywhere later. Grandparents were really a blessing for us. Missing both of them, but could feel their love and warmth always around me.

Waiting for the time to visit the farm and the village again.


Sharing this for Parul's Thursday Tree love 89 .

Wednesday 10 June 2020

LOOKING ABOUT MYSELF POSTER


Looking about myself - a good theme for children to know better about themselves. Creating a poster is an awesome concept to depict their thoughts. 

Self analyzation or realisation is an important quality that needs to be inculcated in children, to know about themselves better, understand their needs and build up their personality. They should be able to find the difference between good and bad behaviour, how to communicate with others, use of vocabulary in their communication. It will inculcate the attitude of enquiry in a positive way.

This poster is one of the activity given as part of home learning. 

This poster is created by my 9 year. 

Tuesday 9 June 2020

INSPIRATIONAL ART CHALLENGE

Hi all,

Today, I am sharing creations by my daughter for a Toilet or Kitchen Roll Art Challenge for inspiration : Re-create a famous piece of art.

She recreated one of the famous painting, The Starry night by Vincent Van Gogh.


The Second creation is depicting Madhubani art.


Saturday 6 June 2020

DIY - ORGANIC HOMEMADE COMPOST

It's a very special moment to write my 300th post today. Colourful Imaginations , the space I started 12 years back to share our day to day happenings and crafts made along with my daughter. We shared many memories here right from scratches. 

Thank you for all my readers who take time to visit our page and share your valuable comments. To make this post a memorable one, we decided to share the process to prepare Homemade Compost, which we do in small quantities for our small garden. 

Let this mark the celebration of World Environment Day.

Revolution of Technology has made our life easy but we missed to protect our environment. Agriculture ranked first among all the occupations in India.

India ranks first in the produce of fresh fruits like Banana, Mango, Guava and ranks second in the produce of Wheat and Rice. Due to lots of economy changes and the Climate change, Agriculture has been ignored and neglected for quite long years. 

Whatever could be the reasons, in recent times, it is regaining its importance. People are facing or understanding the reality of unhealthy produce of vegetables and fruits. Many started the concepts of Organic farming and terrace gardening growing their own healthy produce.


Homemade compost is being practised in many households, without knowing the benefits it gives the environment. In our house, we have a garden, hence, we directly use the daily vegetable wastes digging the soil near plants.

We are sharing the basic procedure to make sample compost at home.

MATERIALS REQUIRED :

  • Waste bin or a small basket or a bucket
  • Vegetables/ Fruits wastes
  • Garden sand
  • Egg shells
  • Crumbled waste wood or papers


STEPS TO BE FOLLOWED: 

STEP 1: 


STEP 2:


STEP 3:

Collect the tea wastes


STEP 4: 

Collect grounded coffee wastes


 STEP 5:

Collect Egg shells


STEP 6:

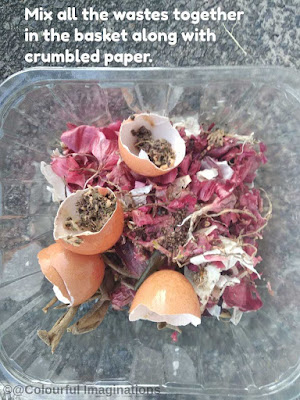
Mix all the wastes and sprinkle little water to keep them moist.


STEP 7 : 

Mix the wastes in layers with little soil and mix it up well. Leave it in your garden or balcony for almost a month or two months depending on the quantity. You can add dried stems from plants or any wood dust in it. Sprinkle water and stir it up daily to avoid drying. It has to be moist. After 45 days to 60 days, compost will be ready to use. 


Note: 

PPT - CHARLES DICKENS