Showing posts with label DIY Crafts. Show all posts

Tuesday, 8 September 2020

DIY - Lighthouse (Needles Lighthouse)


Last Sunday, we had a day trip to Isle of Wight, a beautiful island with lots of nature attractions. One of the most landmark attraction is the Needles Lighthouse. My younger one, was excited to watch Needles lighthouse.

The Needles Lighthouse is an active 19th century lighthouse located on the chalk rocks on the coast of the Isle of Wight in the United Kingdom, near sea level. It was designed by James Walker and was completed in 1859 from granite blocks, stands 33.25 metres (109.1 ft) high and is a circular tower with straight sides. It replaced an earlier light tower on top of a cliff overhanging Scratchell's Bay, which was first lit on 29 September 1786.A helipad was built on top of the lighthouse in 1987. The Needles Lighthouse was automated in 1994 and the keepers left the lighthouse for the last time on 8 December. 


He created a model of Needles , for the theme ' Landmark or any attractions that caught your eyes during a beach trip' using Kitchen tissue roll, colours, Red and Green LED lights and few shells.

Family trips or any educational trips has to be planned for children to help them learn more about it. Every trip marks a memorable moment for them. They try to recreate the memories or mark their trip through drawings or journals.

As parents, we need to encourage them for writing journals. Practising journals will improve their memory.

Happy Parenting !!


Saturday, 5 September 2020

DIY- LIGHTHOUSE


THINGS REQUIRED :

Waste paper
Glue
Shells
Cardboard

STEPS TO BE FOLLOWED :

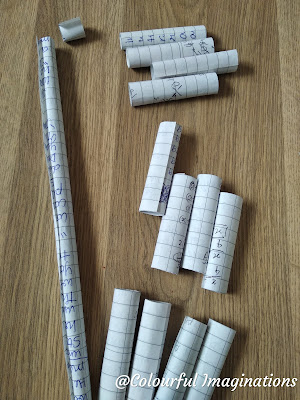
1. Cut the waste papers and roll them as shown.


2) Colour half of the rolls in Red .


3)  Glue the rolls in square shape as shown and complete the light house.


4) Glue the block to a cardboard base and decorate it with Shells. Lighthouse model is ready.


DIY - MODEL OF MY SCHOOL


'How about creating a model of your school?' I asked my son. 

'Oh yes ! It's easy, I can create it, Amma ' replied my son. 

School was locked down for 5 months. Lets see, how he created the model. 

THINGS REQUIRED :

Empty cereal or any boxes
Plain Cardboard
Trees or plant cutting from the magazines
Few net packs.

STEPS HE FOLLOWED :

1) Remember his school, took a paper and drew a rough draft re-collecting the building structure.
2) Assembled the empty boxes in the same structure, glued them thick and allowed it to try for a day.


3) Painted the building in Red, the colour of his school building. Fences in brown.


4) Glued Trees and Plants cutting to the fences.
5) Fixed the basket ball pole using paper straw and basket using net pack.
6) Fixed the food ball goal pole using net packs.


7) See-saw with children paper cutting and Pizza hold as Chair.


Model of the school is ready for display.
 

I observed various developments in him, 

  • Drew the rough draft of the model.
  • Chose the box sizes to suite his structure.
  • He created the model with his own perceptions.
  • Stayed calm and focused on perfections.
  • Took two days completely to re-create it.

Great Appreciation for his creation and patience.


Wednesday, 26 August 2020

DIY - CLAY GANESHA


Eco friendly Ganesha's are always welcomed. Ganesh Chathurthi is celebrated by children with full fervour. Lord Ganesha, the elephant god is strongly believed to bless children with knowledge.

Today, sharing our little Ganesha created by my 9 year old. Greatly appreciate his patience in creating his own idol and for understanding the importance of Eco-friendly idol.

Crafted by little hands, our little Ganesha looks magnificent. 
 

Tuesday, 25 August 2020

DIY - GANESHA


Ganesh Chathurthi is one of the festivals that brings happiness and joy for children. All the children loves Lord Ganesha. The festive mood starts with trying their hands on drawing, painting or crafting their own Ganesha. 

Today, we are sharing one of the children hand crafted home made Ganesha.


Things Required: 

Turmeric powder - 3 tsps
Maida - 1 cup
Sugar - 1 tsp
Rose water - as required
Decorative items.

STEPS TO BE FOLLOWED:

1) Knead maida with Turmeric powder, Sugar, Rose water in to a soft dough.


2) Roll out small balls of th dough and start shaping the friendly Ganesha.


3) Fix the body parts, by brushing water or by toothpicks. Ganesha is ready for prayers.


Saturday, 8 August 2020

DIY - RAKHI

Rakshabandhan is a special celebration in India, signifying the importance of brother sister relationship. On this day, sisters tie rakhi to their brothers to protect them against all odds and pray for their long life and happiness.

MATERIALS REQUIRED 

White strings or threads - 3 of same length

Beads and a pendant

STEPS TO BE FOLLOWED :

1) Take the strings and tie a knot at one side.


2) Attach a bead and tie a knot, hence the bead will not move.


Wednesday, 24 June 2020

DIY- PEN STAND


Today, I am sharing a simple DIY - Pen Stand. 

MATERIALS REQUIRED :

  • Empty Actimel bottles - 5 nos
  • Any round shape box lid
  • Glue
  • Colours


STEPS TO BE FOLLOWED :

1. Clean the actimel bottles well and remove the wrappers.


2. Decorate the empty bottles of your choice design. I designed Warli art.


3. Glue the bottles to the box lid. Allow it to dry well for a day.


4. Once dried completely, fill it with paint brushes, pens and pencils.


Tuesday, 19 May 2020

HOW TO OBSERVE STRESS IN CHILDREN AND WAYS TO HELP THEM OUT -- DIY - TOY ROBOT


No school, complete lockdown for two months, no outdoor games, no cycling, bored of watching cartoons and movies, children will undergo a lots of stress than elders. We have to appreciate their understandings of the present situation and staying back in homes helping us. 

A simple child psychology is that they may not be able to burst out or express their stress, but yes there will be a moment we as parents can observe. 

Some emotions during their stress :

  • Sudden outburst of tears with no reasons
  • mood swings
  • restlessness 
  • distracting from their homework
  • less appetite
  • loneliness ; since they miss their friends in school, they try to talk with their dolls considering them to be their buddies . 

These may be observed that can reveal their stress. 

As parents, we can handle it , if we can follow these : 

  • Let's not build their stress by questioning them, " What happened ?" in a firm voice. Instead, hug them tightly, comfort them and tell them, 'Let's play together'.
  • Slowly, cheer them up and engage them up by reading stories, play with them or craft with them. They need diversions to get them involved. 


Crafting or any artwork can bring diversions in them. It is one of the best way to get children involved. Let them create art on their own. Creative play activties will be one of the way to overcome a stress. Involving them in an activity of their choice, they easily forget their stress.

Today, I am sharing an interesting DIY - TOY ROBOT created by our son for a play activity.


MATERIALS REQUIRED :

Empty cans/bottles ( We used empty salt and actimel bottles)
Pimpom balls
Glue
Colours

STEPS TO BE FOLLOWED :

1. Collect the empty bottles and clean them well. Remove their label wrappers 


2) Glue the bottles with the glue to form a robot. Small bottles for legs and hands. Salt bottle to form the body. (Please note : He used fast settling super glue. If guided by parents, you can use them or use kids friendly glue)


3 ) Robot is set. Allow it to try completely. We allowed to dry for a day.


5) The next day, paint and decorate the robot using colours, pompon balls and pipe cleaners for antennae.


Allow it to dry. Toy Robot is ready to play with. 

Happy Crafting !! Happy Parenting !!


Thursday, 2 April 2020

HOLIDAY FUN ACTIVITY FOR KIDS - VIKING COSTUME FOR BOYS

Hi all,

With the current lockdown situation, to keep the children engaged, we scheduled their time with lots of fun activities. We are spending more time with them to have more quality moments. Excluding their online school classes, here we tried to have one such fun activity, dressing up like Viking Pirates. 

Our young kid is learning about Vikings in their Social/ History class, he speaks more about them, he crafted his own armour and axes at home. Today, I am sharing his virtual learning concept and crafts designed by himself to look like a Viking Pirate.


Materials Required :

Waste cardboard
Folder sticks -2
Drying cloth clips
Origami Sword
Hairbands
Horn Cutouts
Simple costume at home
Boots( Long Rain boots)

Steps to be followed :

1) Painted the cardboard to craft armour or shield.


2) Attach clips to the File sticks to shape axe.


3) Dress up your child in the costume. Viking Pirate is ready.

Happy Parenting !!!


Wednesday, 18 December 2019

CHRISTMAS BOOKMARK

A Simple DIY fun filled kids activity for Christmas. Let's design our own gifts and share it with friends.


MATERIALS REQUIRED :

Red Coloured thick paper
Tissues
Glue
Letter templates from Magazine
Thick card paper

STEPS TO BE FOLLOWED :

1) Draw Santa in the red paper and cut out the drawing.
2) Glue tissues and white paper cuts out to decorate Santa.
3) Glue Santa and the Merry Christmas letter print cuts to the thick card paper.

Christmas Bookmark is ready to be gifted .

Tuesday, 17 December 2019

DIY KIDS SEASONS CALENDAR


MATERIALS REQUIRED :

Coloured A4 sheet and A4 white sheet
Colours (any medium)
Glue
Calendar printed sheets

HOW TO CRAFT :

1) Cut out A4 white sheet in quarters and make kids to draw or design seasons.
2) Glue them to the coloured sheet in 4 corners with the printed calendar sheets in the middle.
3) Seasons calendar is ready for New year 2020. This was done by my son for his class activity.


Tuesday, 26 November 2019

DIY - MAZE BOARD

It's been years, I logged on to my space here. Yes, a short break from a profile of a working mom to stay at home mom. The Transition was initially very peaceful, gave me more relaxation , more holidays, no more application for leave or permissions.

We have re-located to a new place, settling down with the changes. With the re-location, I got to spend a month time with the children, which I have missed for a very long period.

I cherish the moments with them, the most valuable moments which most of working parents yearn for, left me with some painful thoughts.

BACK AGAIN TO START WITH, here

A Simple DIY Maze game, designed for Best of Waste Competition. Yes, my daughter won a prize for this game.


MATERIALS REQUIRED: 

Slate board 
Straws
Glue
Decorating colours
Small beads/ Spherical metal balls
Glue

PROCEDURE :

1) Clean the board, if required paint it with your favourite colours. Dry them completely. 
2) Cut the straws of various shapes and glue them to design a maze. Let it dry for an hour.
3) Game board is ready to play with the balls.

Thursday, 19 December 2013

DIY SNOWMAN


THINGS REQUIRED :

Used feeding bottle cap
Satin ribbon
Red handmade paper
Bindhi's / Stickers
Buttons
Cotton
Glue
Beads
string

STEPS TO BE FOLLOWED :

1 ) Glue the rolled cotton ball to the head of the cap.
2) Stick bindhi for eyes.
3) A triangle cut coloured paper nose and cap for the snowman.
4) Glue buttons to the cap and satin ribbon for the scarf .
5) Tie beads with string and glue it to the hat .

DIY - Snowman is ready .Linking it with Shruti Artsy Craftsy Challenge .

artsy craftsy dec 2013 Artsy Craftsy Dec 2013   Christmas crafts artsy craftsy  Christmas Crafts

Saturday, 14 December 2013

DIY PHOTO FRAME


I made this DIY Photo frame along with my daughter for  Photo Framing Competition in her school.

THINGS REQUIRED :

Colourful straws
Cartoon stickers
A Thick cardboard/handmade paper 
Glue

STEPS TO BE FOLLOWED :

1. Glue the photo to be framed in the centre of the cardboard / paper.
2. Assemble and glue the straws to its sides.
3. Stick kids favorite cartoon stickers.
4. Roll and glue a satin ribbon for hanging it on the wall.

Wednesday, 23 October 2013

DIY DIWALI CARD --COFFEE / TURMERIC PAINTING


A simple DIY Diwali card with old invitation cards and painted these diya's with Coffee and Turmeric powder.

Tuesday, 22 October 2013

DIY GIFT TAGS / BOOKMARKS


Diwali is round the corner , busy packing gifts for your loved ones .Here are few of simple DIY Gift tags / Bookmarks made from old invitation cards / kids toy / crayon wrappers we can make it from home.You can pattern your card as you wish it to be .

Tuesday, 19 March 2013

DIY HONEY BEE

Hello all , i am very much delighted to post my 250 th post here. Thank you for all your lovely support .


THINGS REQUIRED :

Paper plate - 1
Yellow coloured cellophane paper - 1
Poster colours 
Glue

STEPS TO BE FOLLOWED :

1) Colour the paper plate yellow , cut out oval shape of it.
2) Make black strips in it with your finger and paint eyes too.
3) Glue wings with Cellophane paper.

DIY honey bee is ready.

Linking it with Artsy Craftsy Challenge - Animal Crafts


Colours dekor Weekly Story - 7

Colours Dekor

PPT - CHARLES DICKENS