Saturday 26 February 2011

MY DAUGHTER'S NATURE CRAFT

Today, am sharing a simple preprimary Nature project for my daughter's school activity. Involve Children in their school homework activity right from simple colouring to crafting. It's an important learning activity for the children. My daughter enjoys colouring and craft work . Last week , she was taught about nature . So , we planned to do this craft.

Sending this to Shruti's Artsy - Craftsy Challenge - Tissue Paper


We drew a tree , mountain , waterfall , river, hut , sun , birds and a rainbow . She painted the mountain with watercolour . River and Waterfall with crepe paper .

Rainbow with crepepapers .

Tree collage with crepe paper . We glued white crepe paper for Trunk and then watercoloured it .

Sun with waste tin cap and crepe paper .


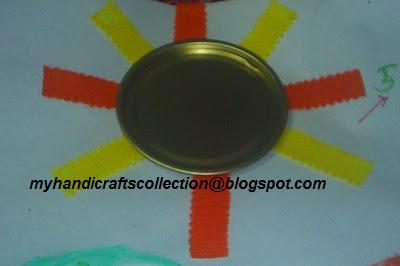
Hut with crepe paper and stripped tissue paper roof ,water coloured brown .


She enjoyed doing this . Hope your kids also enjoy doing this . Have a great week end .


Happy Parenting !!

Saturday 19 February 2011

MY DAUGHTER'S PINGU

This egg shell penguin won me third prize in Art from Waste Competition held in my daughter's school . I made only the penguin in school . With that , my lil one and myself made this house for our little pingu . Hope you all will enjoy this craft.


MATERIALS REQUIRED :

Egg shells - 2
Black paper from magazines .
Tissue paper - 1

Glue
Poster paints
Cotton
Thermocol
Paper Plate

STEPS TO BE FOLLOWED :


1) Clean the egg shell and dry it for some time.
2) Draw the shape of penguin with pencil in the shell .
3) Paint the shell in black(back side) and white (front side) . Allow it to dry.

4) Then , stick oval stickers for eyes , beak with black paper and draw mouth .
5) Take a piece of tissue paper and cut hairy for its hair .
6) Draw the shape of feather and feet in black paper . Cut to its shape and then glue to the shell.
Pingu is ready .


7 ) Take a thermocol sheet . Glue some cotton sheets to it , to display like snow . Make Pingu to stand in it .


8) Take a paper plate fold it it the center ,glue it . Draw the entrance and glue the tissue paper as shown . Igloo is ready .


Enjoy this craft and have fun .Sending this to February Carnival Let's go the DIY way .

Friday 18 February 2011

MY DAUGHTER'S NURSERY CRAFTS

This board was prepared with all the craft work by my lil one in her nursery .


This board has a Christmas Bells , Sand Arts , Frog , Hand print , Black bug , Honey bee , Igloo , Christmas tree and helicopter .

Wednesday 16 February 2011

WORDLESS WEDNESDAY - STONE HENGE , BIRMINGHAM

This photo was taken when we in were in UK (last year ) . This photo was selected for wordless wednesday by my hubby , who loves photography . This was taken by him , one of his favourite photograph.


Monday 14 February 2011

TISSUE PAPER RANGOLI ON WALLS

When Shruti announced Artsy - Craftsy Challenge - Tissue Paper, this was the first craft that came in mind . This is a bit time consuming one and need a lot of patience .


MATERIALS REQUIRED :


Tissue paper - 1
Colour gift wrapper and Chart paper.


STEPS TO BE FOLLOWED :

1) Fold the tissue paper in the centre to form a rectangle and then fold it again in the centre to form a square .

2) Cut your preferred shapes on the folded sides of the square leaving a space between each and every shape using the scissors .

3) Then fold the square to form a triangle and repeat step 2 .

4) Then , carefully open the folds , you would have developed a lovely design .

5) Glue the tissue paper to a coloured paper and stick them to a chart paper to have a thick background .

6) You can either frame it or glue to your walls during parties or form a background for god idols while making thorams/decorations for ganesh pooja,krishna jeyanthi , Varalakshmi viratham etc .

Note : If you cannot follow these steps , please let me know . I will post photos for each and every step . This time , i forget to click the pictures .


Saturday 12 February 2011

SMILEY DOLL KEY CHAIN

My daughter loves to have smiley balls or key chain.Yesterday, i gave her a smiley key chain . She wished to have a smiley doll . So , we finally tried our best to make it appealing .

MATERIALS REQUIRED :

1) Crepe papers and Tissue Paper .
2) Glue
3) Smiley key chain.
4) Paper cup.

STEPS TO BE FOLLOWED :

1) Glue crepe papers of your choice colours to the cup to make a dress for smiley .


2) Take a waste thick paper . Trace out the bottom circle shape of the cup in it . Then , draw a oval shape around the circle .Cut the circle out first from the oval shape and then oval shape from the paper.

3) Just fit the shape as shown . Folding the extended portion in the centre to form hands .Then , glue crepe papers to it.


4) Glue the smiley to the cup . Take a white tissue paper , cut it into half and fold it to form a small rectangle shape . Make a hole in the centre for the chain and stick it to the head . follow the same step to stick hair in the back of the head .Once it gets dried , cut the tissue paper to for hair for the smiley .


5) Stick a small satin ribbon on both sides for the smiley . Doll is ready .
Sending this to Shruthi's Artsy-Craftsy challenge Feb 2011 .


Wednesday 9 February 2011

COLLAGE - TREE

This tree was done as a part of my daughter's school project , Nature Project .

MATERIALS REQUIRED :

Thermocol sheet - 1 small size
Leaves pictures from old magazines.
Brown colour papers from old magazines .
Glue.

STEPS TO BE FOLLOWED :


1) Draw the shape of a tree in the thermocol sheet . Cut it out with a thermocol cutter.
2) Then cut the leaves pictures from the magazines to the shapes that fit your tree shape and glue to it.
3) Then , cut the brown colour papers from the magazines to your trunk shape and glue to it .

Tree is ready . Your kids will enjoy this .

WORDLESS WEDNESDAY - DUDH SAGAR WATERFALL FROM THE MOVING TRAIN .


Tuesday 8 February 2011

CHRISTMAS TREE

Finally , i managed to get these pictures from my memory card though my camera is still not working . My lil one and myself made this Simple and Quick Christmas tree for Christmas 2010 .

MATERIALS REQUIRED :

1) Kids Party Caps .
2) Green Colour Crepe paper .

3) Kids plastic flower earings and some decorative kundan pieces.
4) A Star sticker.
5) Glue

STEPS TO BE FOLLOWED :

1 ) I chose the green cap .


2) Glue the crepe paper over the cap in this way . This way shows alternate shades of green .


3) Then , decorate the tree with the kids plastic flower studs and decorative pieces . With a golden star in the top .


4) Christmas tree is ready.Sending this to Shruthi's Artsy-Craftsy challenge Feb 2011 .


Monday 7 February 2011

KITE - SANKRANTHI CRAFT

This is the kite made for my daughter for Sankranthi .


MATERIALS REQUIRED :

Thermocol sheet - 1
Gift Wrapper - 1
Aluminium Paper - 1 sheet
Thermocol balls - 1 packet
Cartoon Pictures of ur kids choice
Glue

STEPS TO BE FOLLOWED :

1) Cut the thermocol sheet in square shape .

2) Cut any coloured gift wrapper of the same shape and glue to it.

3) Attach the colour strips for the tail of the kite .

4) Decorate the kite as you wish . I used thermocol balls and cartoon pictures .

Kite is ready .

Tuesday 1 February 2011

FANCY DRESS COSTUME - TREE FOR KIDS


This was designed for my daughter .

Materials Required :

1) Card board sheets .

2) Plastic leaves and flowers .
3) Glue 
4) Green and Brown Velvet Paper .

Steps to be followed : 

1) Draw the shape of trunk and leaves in the cardboard.

2) Cut to their shape and glue the corresponding colour papers to their parts . 
3) Then , stick the flowers and leaves to the branch.

4) Make holes to tie strings for dressing up the kid.

This craft goes to Artsy-Craftsy Challenge , Jan 2011 by Shruthi .


PPT - CHARLES DICKENS